By: Team AY1920S1-W13-1 Since: Sep 2019 Licence: MIT
- 1. Introduction
- 2. Setting up
- 3. Design
- 4. Implementation
- 5. Documentation
- 6. Testing
- 7. Dev Ops
- Appendix A: Product Scope
- Appendix B: User Stories
- Appendix C: Use Cases
- Appendix D: Non Functional Requirements
- Appendix E: Glossary
- Appendix F: Product Survey
- Appendix G: Instructions for Manual Testing
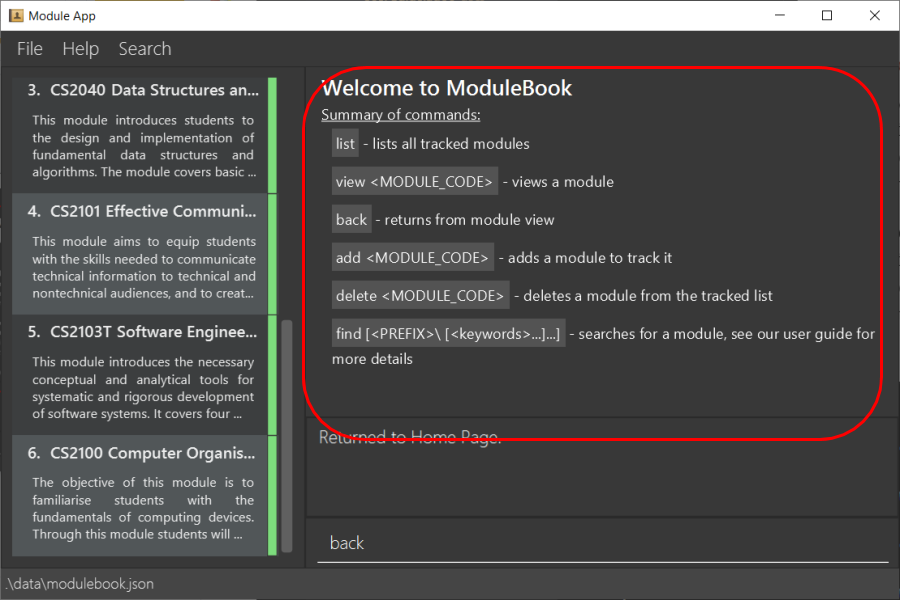
1. Introduction
This developer guide describes the software architecture and implementation details of the software, ModuleBook. It is intended to be read by developers and software testers for the software.
2. Setting up
Refer to the guide here.
3. Design
3.1. Architecture
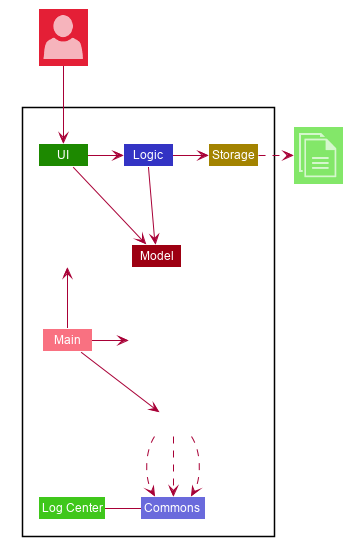
The Architecture Diagram given above explains the high-level design of the App. Given below is a quick overview of each component.
The .puml files used to create diagrams in this document can be found in the diagrams folder.
Refer to the Using PlantUML guide to learn how to create and edit diagrams.
|
-
At app launch: Initializes the components in the correct sequence, and connects them up with each other.
-
At shut down: Shuts down the components and invokes cleanup method where necessary.
Commons represents a collection of classes used by multiple other components.
The following class plays an important role at the architecture level:
-
LogsCenter: Used by many classes to write log messages to the App’s log file.
The rest of the App consists of four components.
Each of the four components
-
Defines its API in an
interfacewith the same name as the Component. -
Exposes its functionality using a
{Component Name}Managerclass.
For example, the Logic component (see the class diagram given below) defines it’s API in the Logic.java interface and exposes its functionality using the LogicManager.java class.
How the architecture components interact with each other
The Sequence Diagram below shows how the components interact with each other for the scenario where the user issues the command add CS2103T.
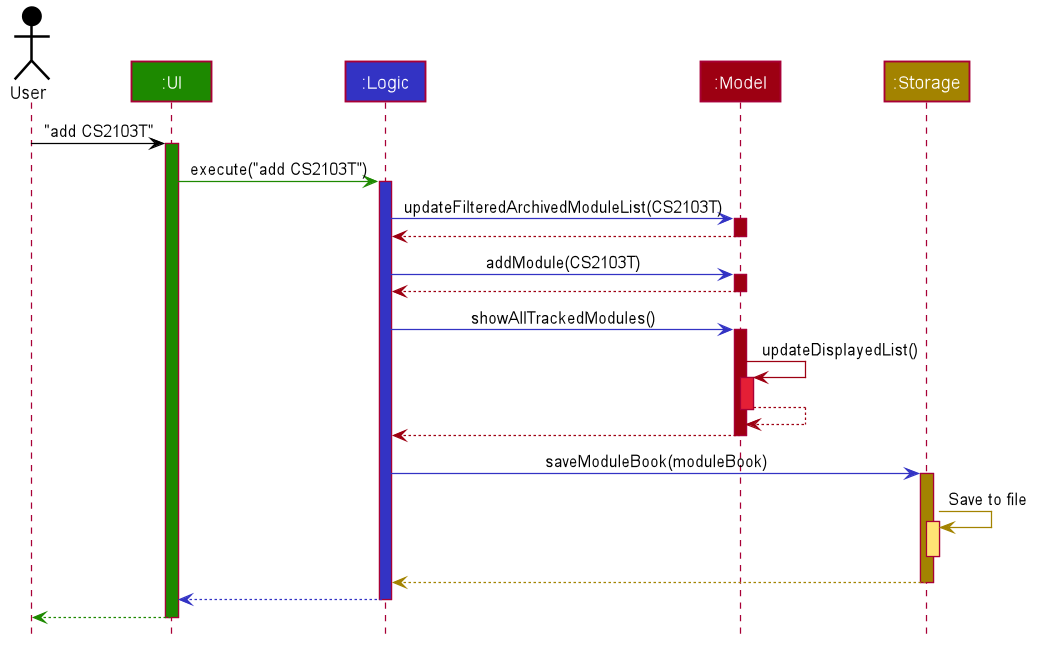
add CS2103T commandThe sections below give more details of each component.
3.2. UI component
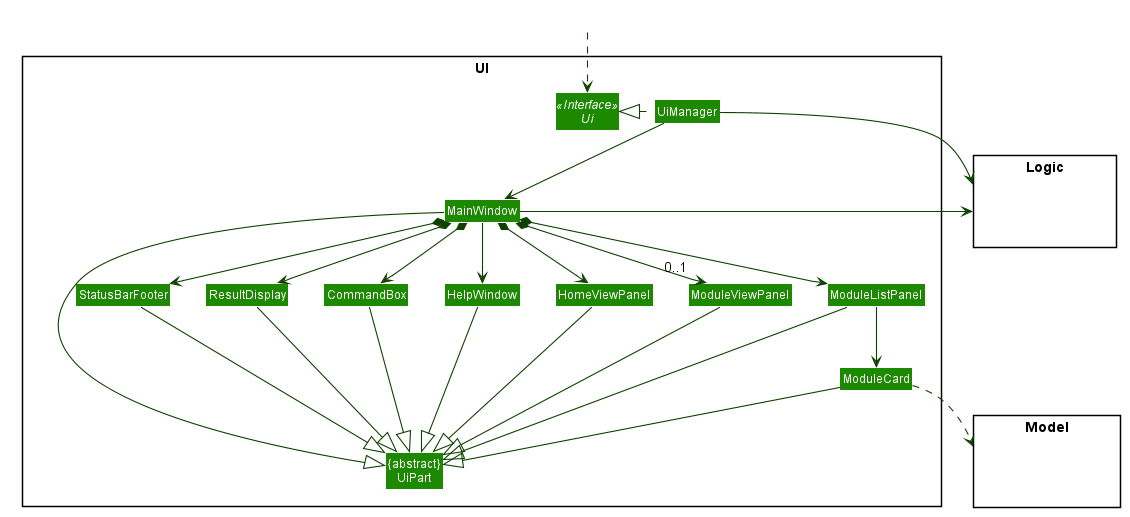
API : Ui.java
The UI consists of a MainWindow that is made up of parts e.g.CommandBox, ResultDisplay, ModuleListPanel, StatusBarFooter, HomeViewPanel etc. All these, including the MainWindow, inherit from the abstract UiPart class.
The UI component uses JavaFx UI framework. The layout of these UI parts are defined in matching .fxml files that are in the src/main/resources/view folder. For example, the layout of the MainWindow is specified in MainWindow.fxml
The UI component,
-
Executes user commands using the
Logiccomponent. -
Listens for changes to
Modeldata so that the UI can be updated with the modified data.
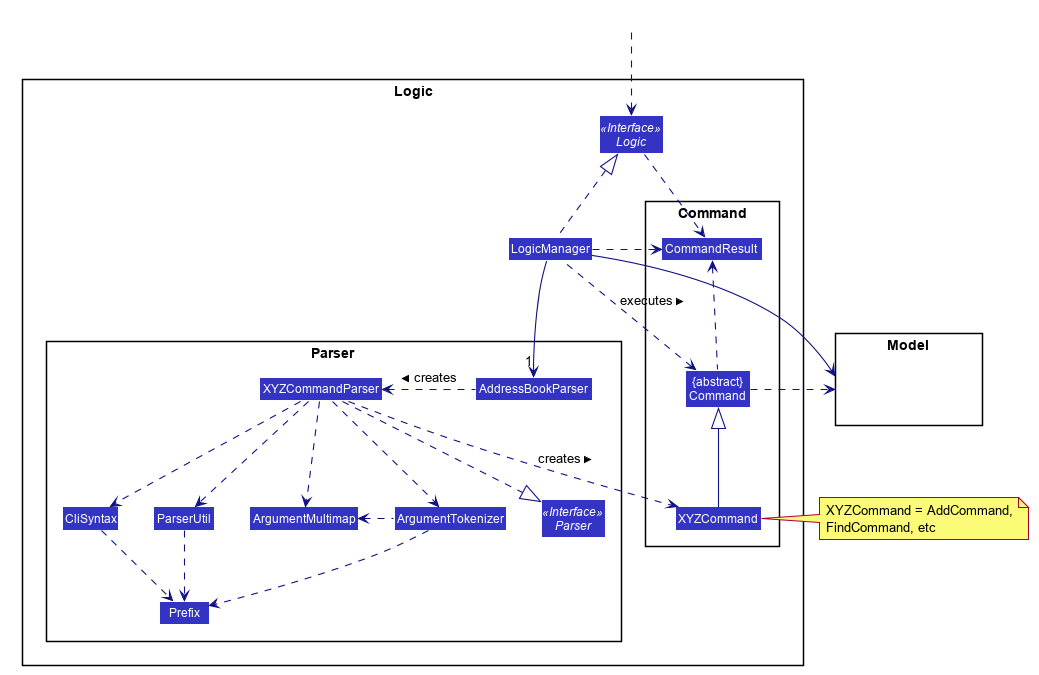
3.3. Logic component
API :
Logic.java
-
Logicuses theModuleBookParserclass to parse the user command. -
This results in a
Commandobject which is executed by theLogicManager. -
The command execution can affect the
Model(e.g. adding a module). -
The result of the command execution is encapsulated as a
CommandResultobject which is passed back to theUi. -
In addition, the
CommandResultobject can also instruct theUito perform certain actions, such as displaying help to the user.
Given below is the Sequence Diagram for interactions within the Logic component for the execute("add CS2103T") API call.
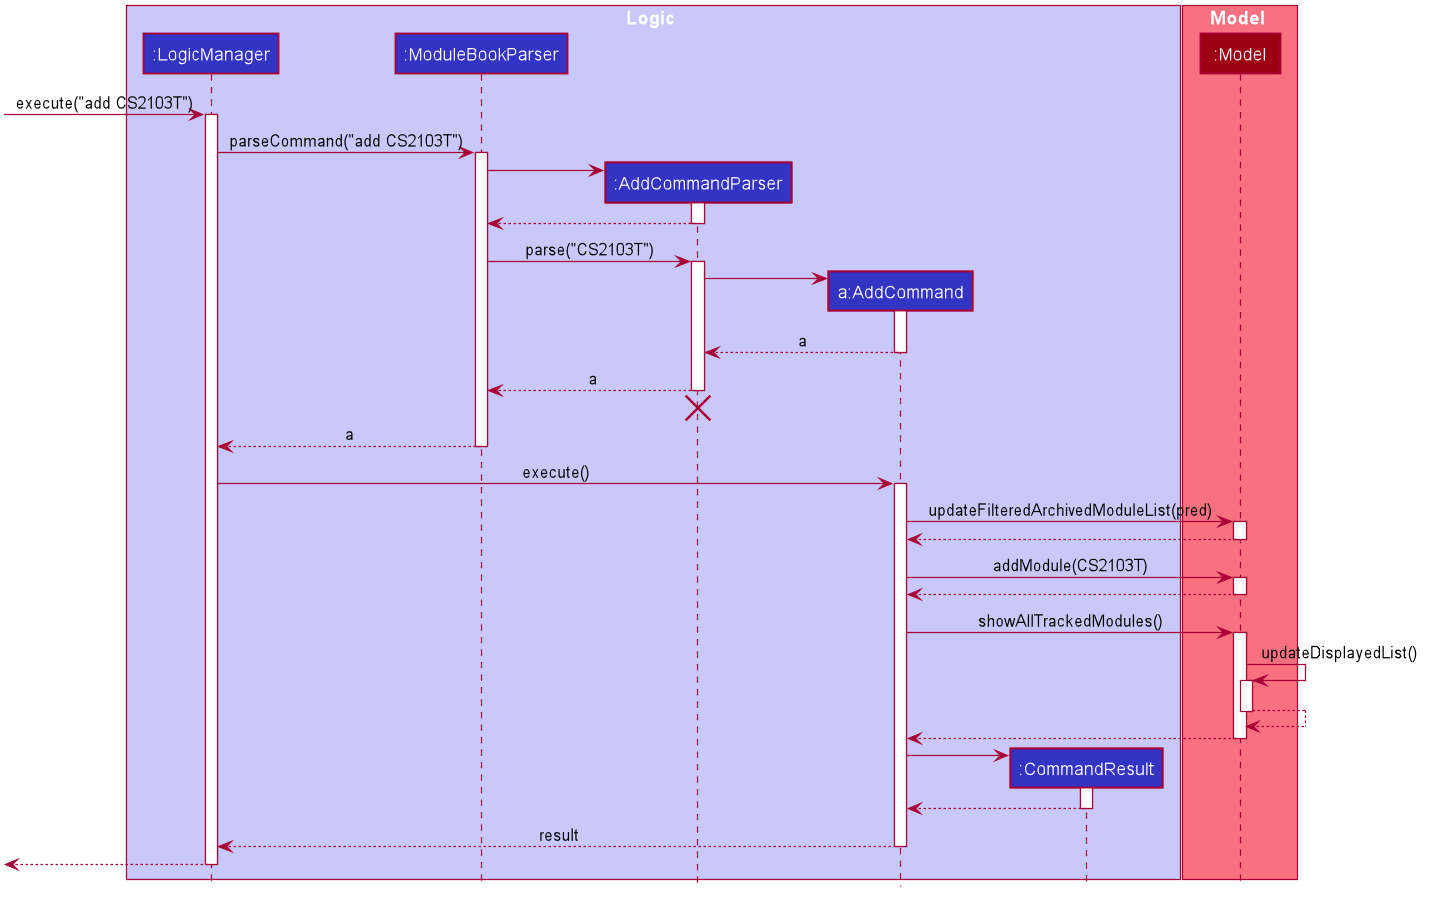
Add CS2103T Command
The lifeline for AddCommandParser should end at the destroy marker (X) but due to a limitation of PlantUML, the lifeline reaches the end of diagram.
|
3.4. Model component
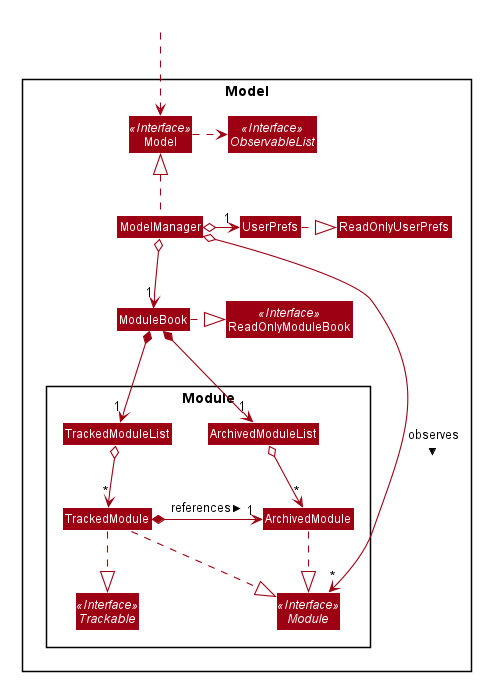
API : Model.java
The Model,
-
stores a
UserPrefobject that represents the user’s preferences. -
stores the ModuleBook data.
-
exposes an unmodifiable
ObservableList<Module>that can be 'observed' e.g. the UI can be bound to this list so that the UI automatically updates when the data in the list change. -
does not depend on any of the other three components.
3.5. Storage component
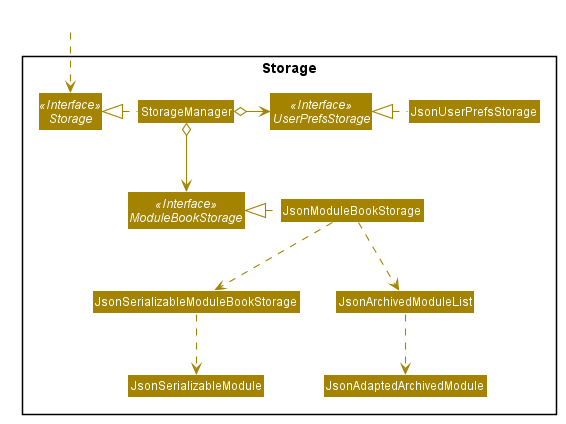
API : Storage.java
The Storage component,
-
can save
UserPrefobjects in json format and read it back. -
can save the
TrackedModuledata in json format and read it back. -
can read the
ArchivedModuledata from json format.
3.6. Common classes
Classes used by multiple components are in the seedu.module.commons package.
4. Implementation
This section describes some noteworthy details on how certain features are implemented.
4.1. Module View Feature
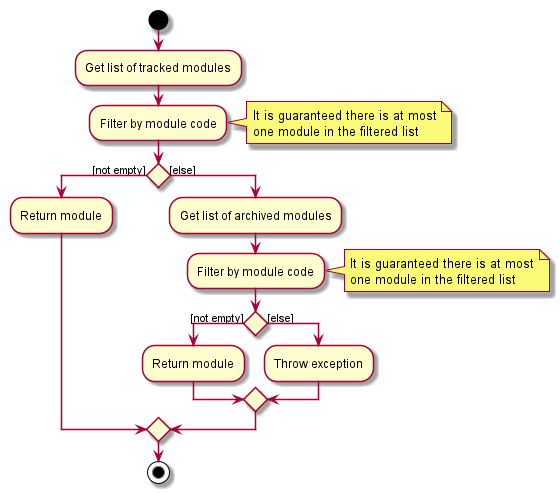
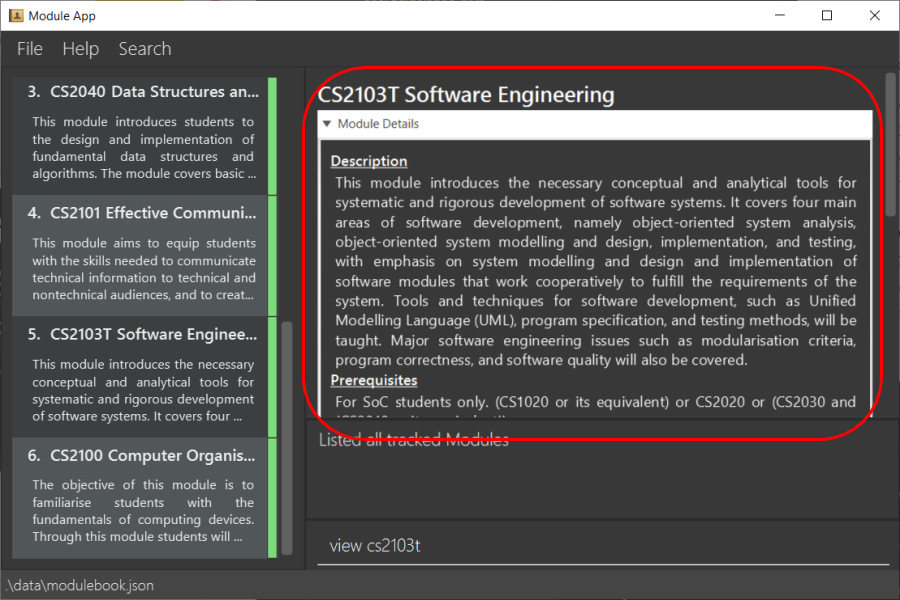
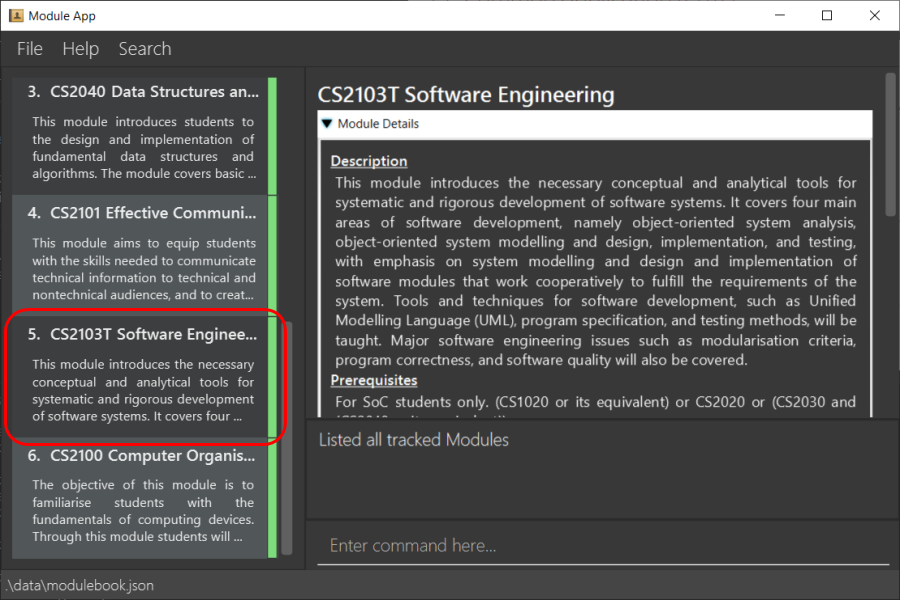
The module view feature allows users to view a module to access extra information about the module. The user can view (and unview) a module using the view (and back) commands.
4.1.1. Implementation
The module view feature is facilitated by displayedModule in ModelManager. The following describes how the displayedModule is modified and read to the Ui.
-
The user enters a view command in the
Ui. -
LogicManagerparses the user input, constructs and executes theViewCommand. -
The
ViewCommandattempts to find the matching module from the list of Tracked Modules, else it attempts to find the matching module from the list of Archived Modules, else it throws an exception. -
The
ViewCommandsets thedisplayedModulein theModeland returns theCommandResultto theLogicManager. -
The
LogicManagerreturns theCommandResultto theUi. -
The
Uigets thedisplayedModulefromLogicManagerand updates the Ui to display the module.
The following sequence diagram shows how the module view feature is executed.
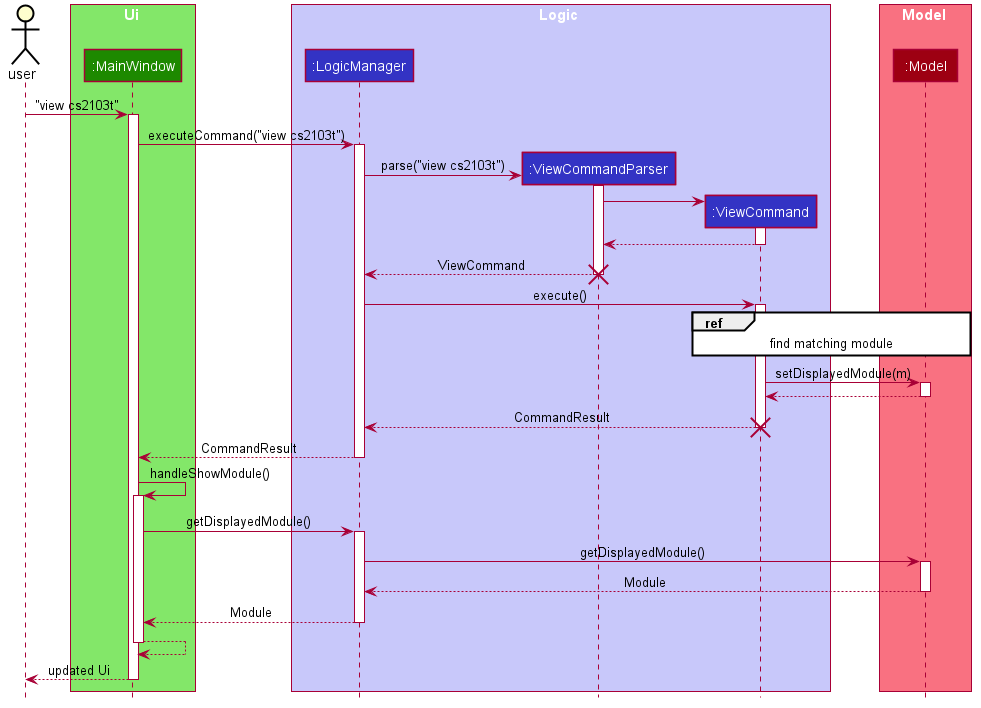
The BackCommand mostly follows the same sequence as described above, except that it does not need to find any module, and sets the displayed module to null.
|
The following activity diagram describes the process of finding a matching module to display.
4.1.2. Design Considerations
Updating the Ui
Current Implementation: New field in the CommandResult that the Ui will check to determine if it needs to update.
Pros:
-
Simple and easy to control what command updates the Ui.
Cons:
-
More difficult to maintain over the course of the project. New Ui elements require new fields to update the Ui.
Alternate Implementation: Every command updates the Ui.
Pros:
-
Maintainance free.
Cons:
-
Potentially inefficient.
-
Possible side effects from certain commands.
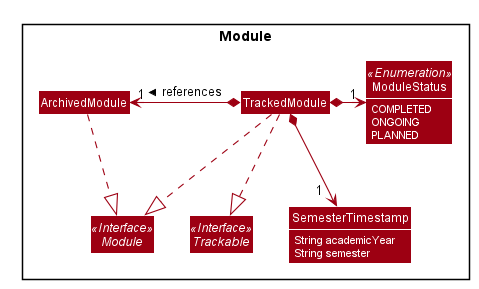
4.2. [Proposed] Marking modules as completed, ongoing or planned
Users can mark modules as
4.2.1. Implementation
The tracked module will have 2 new fields: moduleStatus and semesterTimestamp.
The moduleStatus will be an enumeration of:
-
completed , -
ongoing and -
planned .
The semesterTimestamp will be a combination of:
-
an academic year
-
In NUS, the academic year representation is prefixed with "AY", followed by the last 2 digits of the starting year, and the last 2 digits of the ending year
-
e.g. AY1920, AY2021
-
-
a semester
-
In NUS, there are a total of 4 semesters. Semester 1, Semester 2, Special Term 1 (ST1) and Special Term 2 (ST2).
-
e.g. 1, 2, ST1, ST2
-
The user will be free to modify the moduleStatus and the semesterTimestamp. The following class diagram will illustrate the above implementation.
4.2.2. Possible Extensions
With the new data, users may be able to easier manage their tracked modules and gleam useful information.
-
Completed modules will be hidden from the module list, but still viewable through alistallcommand (proposed command) and accessible through theviewcommand. -
Completed modules andongoing modules can be used to determine if a user fulfil the requirements for theirplanned modules .
4.3. Search filtering feature
4.3.1. Implementation
The search filtering feature Uses different categories of predicates
to narrow down the search space of the archived module list. The user is able to able to combine different categories
of search to find modules that passes all the user defined filters. This can be achieved through the use of Predicate
which can be chained with additional predicates and applied to a FilteredList. This requires additional predicate classes that searches their individual fields
for the keywords.:
-
ModuleCodeContainsKeywordsPredicate— Tests that amodulemodule code matches any of the keywords given. -
TitleContainsKeywordsPredicate— Tests that amoduletitle contains all of the keywords given. -
DescriptionContainsKeywordsPredicate— Tests that amoduledescription contains all of the keywords given. -
PrerequisiteContainsKeywordsPredicate— Tests that amoduleprerequisites matches any of the keywords given. -
PreclusionContainsKeywordsPredicate— Tests that amodulepreclusions matches any of the keywords given. -
SemesterContainsKeywordsPredicate— Tests that amodulesemester matches any of the keywords given.
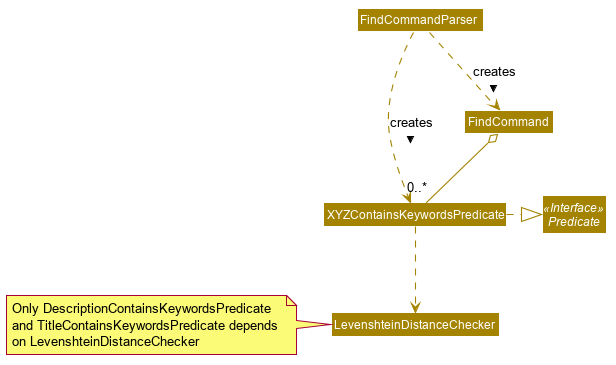
As shown in the figure above, predicate classes are created in the FindCommandParser, the list of predicates is used to construct a find command. Note that only DescriptionContainsKeywordsPredicate and TitleContainsKeywordsPredicate depends on LevenshteinDistanceChecker, the rest of the predicates do not depend on it.
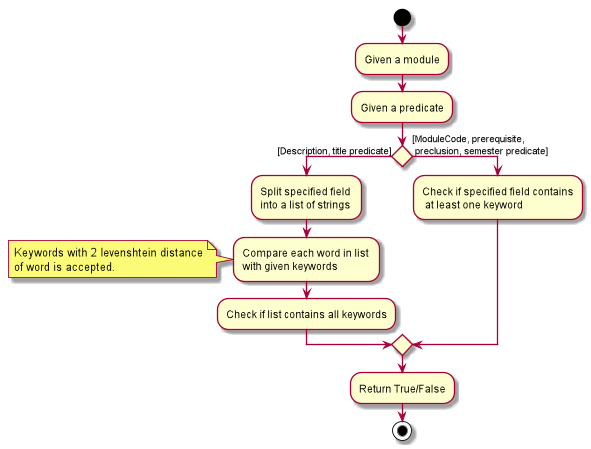
The figure above shows how each predicate checks for the keyword. Do note that DescriptionContainsKeywordsPredicate
and TitleContainsKeywordsPredicate requires their specified field to contain all of the keywords, while the rest of the
predicates returns true as long as their field contains at least one of the keyword.
The user is able to use any combination of filters and the order of input should not matter. Examples of valid find commands:
The following sequence diagram shows how the find operation wold work:
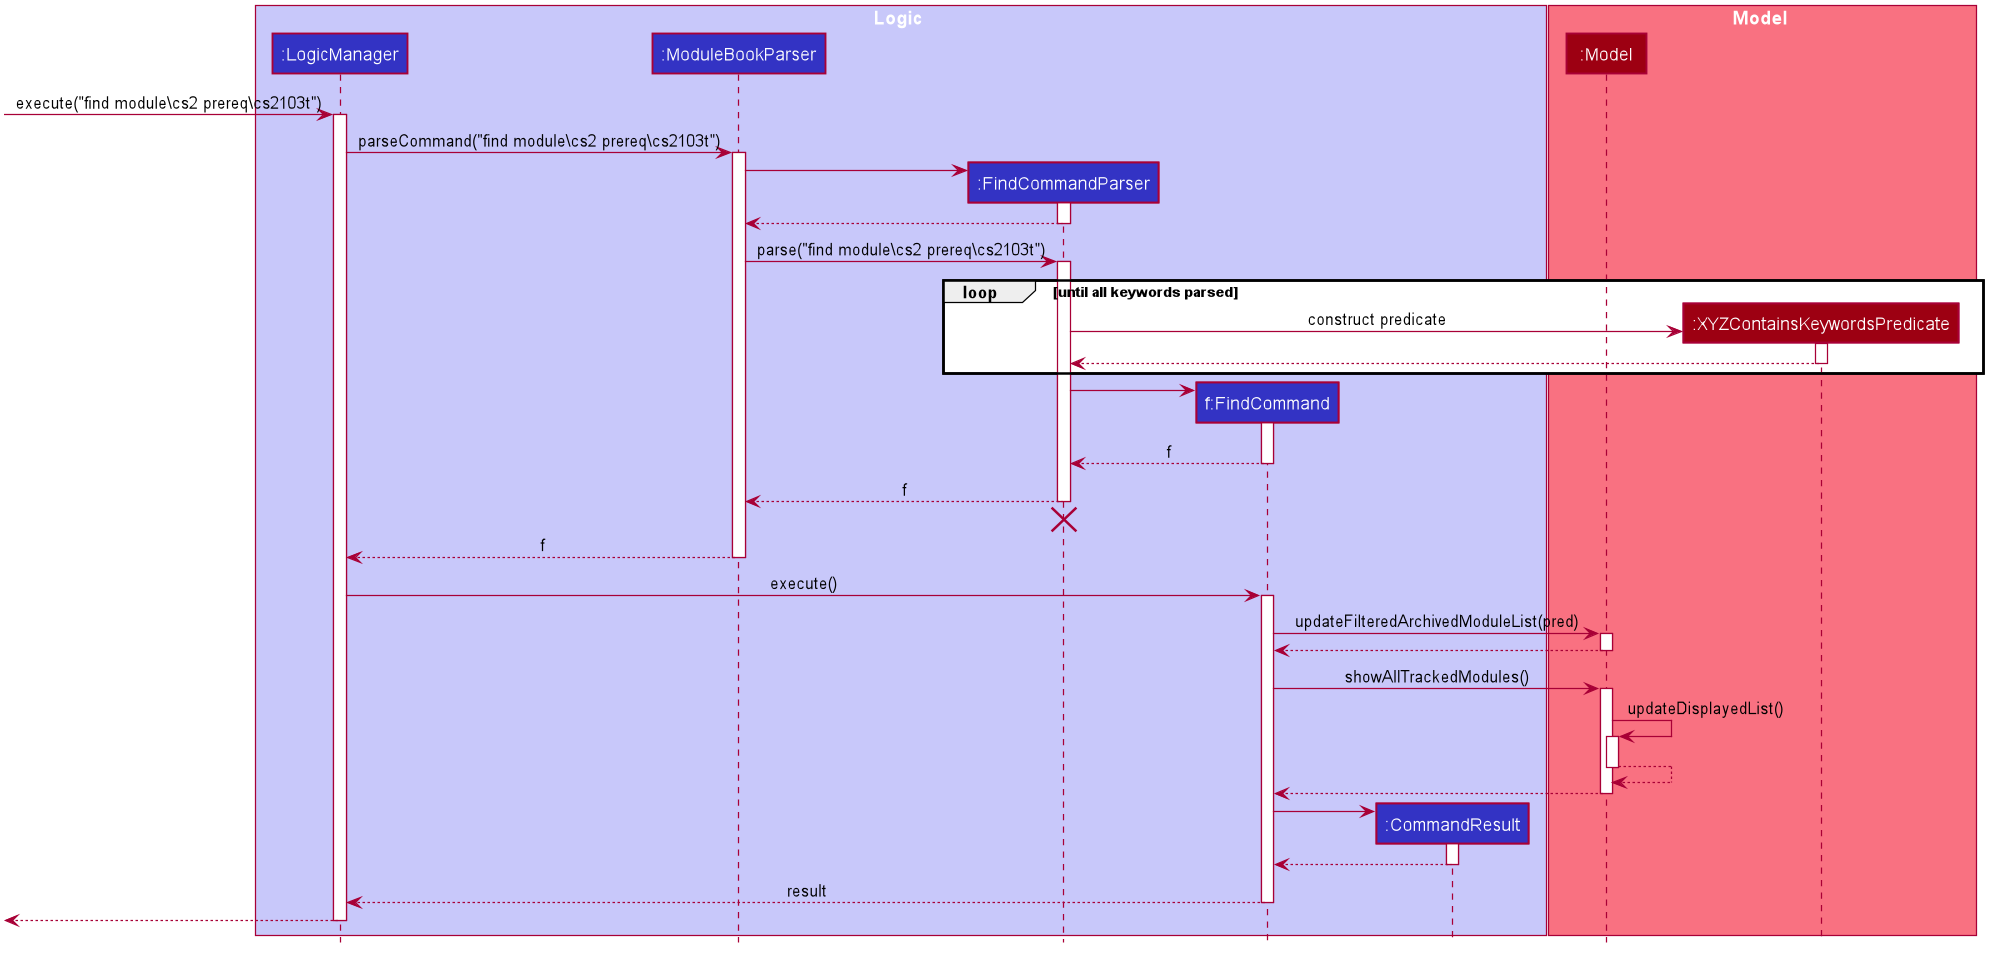
The lifeline for FindCommand should end at the destroy marker (X) but due to a limitation of PlantUML, the lifeline reaches the end of diagram.
|
As represented in the figure above, when a FindCommandParser is constructed by ModuleBookParser#parseCommand, the FindCommandParser would construct a list
of Predicate<module> based on the parsed arguments, which is used to construct a FindCommand.
During the execution of FindCommand#execute(), each predicate is chained and applied to the FilteredList.
Finally, a FilteredList of Modules that passes all of the filters will be displayed.
4.3.2. Design Considerations
Aspect: Requirements.
-
Module field requirements: Information from the
archivedModules.jsonwould have to be abstracted out as individual fields in theArchivedModuleobject.-
pros: Added fields can be used for future developments.
-
cons: Can potentially slow down
Moduleconstruction and operations due to increased size for eachModuleobject.
-
Aspect: Fuzzy search.
-
Search with spelling mistake tolerance: Due to the potential of spelling mistakes within fields such as the module and module discription which does not rely on module codes, searching these fields can accept mistakes with a degree of 2 Levenshtein Distance from any of the original intended word.
-
pros: Much more robust searching potential.
-
cons: Will slow down the search.
-
Aspect: Incremental development.
-
Adding new search filters: Developing and integrating new filters.
-
pros: Filters can be developed independently and incrementally, filters can be integrated based on priority.
-
pros: Can be further adapted to search fields from
DeadlineandLinks.
-
4.4. Deadline Management Feature
As a module management system, one of the important features will be the management of deadlines for each modules.
This section will elaborate the current implementation and design considerations of deadline management feature.
4.4.1. Current implementation
The deadline management feature supports the following main operations.
-
add- adds a new deadline task to the respective module. -
edit- edits the description or date and time of deadline task. -
done- marks a deadline task as done. -
doneAll- marks all the deadline tasks as done. -
inProgress- marks a deadline task as inProgress. -
undone- marks a deadline task as undone -
delete- deletes an existing task from the deadline list. -
deleteAll- deletes the entire deadline list from a module.
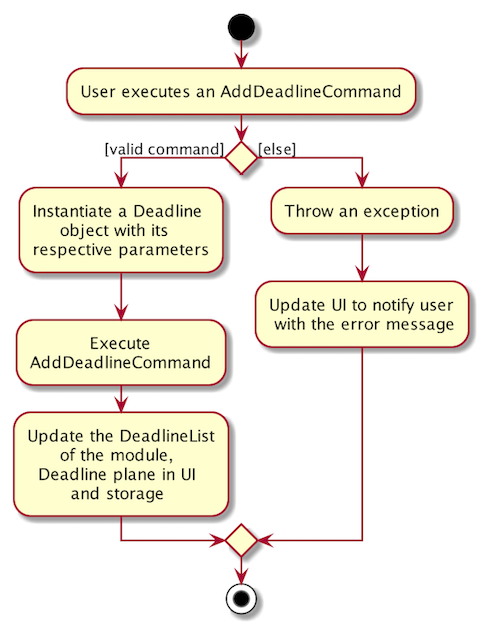
The following activity diagram summarises what happened when a user executes the AddDeadlineCommand:
The format to add deadline command is as follows:
deadline 2 a/add d/description t/dateAndTime p/priority
The add deadline mechanism is facilitated by AddDeadlineCommand and AddDeadlineCommandParser.
It takes in the following input from the user: MODULE_LIST_NUMBER, DESCRIPTION, DATE_AND_TIME and
PRIORITY which will construct a Deadline object to be added to the deadline list.
Given below is an example usage scenario of how add deadline mechanism behaves at each step.
Step 1. The user executes:
deadline 2 a/add d/do homework t/2/12/2019 1645 p/MEDIUM
Step 2. LogicManager would use ModuleBookParser#parseCommand() to parse input from the user.
Step 3. ModuleBookParser would determine which command is being used and creates the respective parser.
In this case, DeadlineCommandParser is being created from the COMMAND.WORD: deadline and
the user’s input would be passed in as a parameter.
Step 4. DeadlineCommandParser would then determine which action is being used and creates the respective parser.
In this case, AddDeadlineCommandParser is created and user’s input would be parsed.
Step 5. AddDeadlineCommandParser would do a validation check on the user’s input before creating
and returning a AddDeadlineCommand with index and Deadline as its attributes. index represents
the TrackedModule list index (i.e 2) which the Deadline object will be added to.
Step 6. LogicManager would execute AddDeadlineCommand#execute(),
checks whether there is an existing module,
then adds to the TrackedModule.
Step 7. AddDeadlineCommand would return a CommandResult
to the LogicManager.
The following sequence diagram illustrates how the add deadline operation works:
4.4.2. Design Considerations
Aspect: Data Structure used to support add command
-
Alternative 1(Current choice) : Use of
ArrayListto store deadline tasks in aTrackedModule.-
Pros: Commands (eg. edit, sort, delete) can be easily supported by a list operations.
-
Pros: Ensures that only one deadline list is maintained for each TrackedModule.
-
Cons: More difficult to maintain over the course of the project. New commands(eg. done, priority) need to edit and maintain the list constantly.
-
Cons: Duplicate deadline tasks harder to identify.
-
-
Alternative 2 : Use a
HashSetto store deadline tasks in aTrackedModule.-
Pros: Duplicate deadline tasks can be identified easily.
-
Cons: Not easy to identify tasks using index.
-
4.5. Logging
We are using java.util.logging package for logging. The LogsCenter class is used to manage the logging levels and logging destinations.
-
The logging level can be controlled using the
logLevelsetting in the configuration file (See Section 4.6, “Configuration”) -
The
Loggerfor a class can be obtained usingLogsCenter.getLogger(Class)which will log messages according to the specified logging level -
Currently log messages are output through:
Consoleand to a.logfile.
Logging Levels
-
SEVERE: Critical problem detected which may possibly cause the termination of the application -
WARNING: Can continue, but with caution -
INFO: Information showing the noteworthy actions by the App -
FINE: Details that is not usually noteworthy but may be useful in debugging e.g. print the actual list instead of just its size
4.6. Configuration
Certain properties of the application can be controlled (e.g user prefs file location, logging level) through the configuration file (default: config.json).
4.7. Link Management Feature
The link management feature allows users to add and manage a set of website links that will be associated with a given module.
4.7.1. Overview of link feature
Implementation
Our application currently supports adding and managing of links specific to certain modules.
The link management feature is primarily facilitated by the following classes:
-
Link- represents a link object -
TrackedModule- represents a module that was tracked. Stores theLinkobjects related to it. -
LinkCommand- embodies thelinkcommand input given by the user and contains the necessary changes that will be made to theTrackedModuleobject. -
LinkCommandParser- parses user input related tolinkcommands and returns the correspondingLinkCommandto be executed.
Each link object is stored in an ArrayList<Link>, which in turn is stored in its corresponding TrackedModule.
In summary, the class diagram of how Link is implemented is shown as:
![][pdfwidth="30%"](images/LinkClassDiagram.png)
The link feature currently recognizes and supports add, delete, edit and launch commands.
Link commands are parsed through the LinkCommandParser class, which in turn calls the respective XYZLinkCommandParser class (i.e. AddLinkCommandParser, EditLinkCommandParser).
The XYZLinkCommandParser class parses and returns a corresponding XYZLinkCommand class, which calls execute() and the TrackedModule will be updated accordingly if the execution was successful.
The following activity diagram summarizes what happens when the link command is entered and executed:
![][pdfwidth="40%"](images/LinkCommandActivityDiagram.png)
An example usage scenario of an add link operation is given below and the behavior of the link management feature is shown.
-
The user launches the application with an existing save file.
ModuleBookis initialized with existingTrackedModule. -
The user inputs
link add n/LINK_NAME l/LINK_URLto add a link with nameLINK_NAME, linked toLINK_URLto theTrackedModulewith the correspondingMODULE_INDEX. -
LogicManagerreceives user input and parses it usingModuleBookParser#parseCommand().ModuleBookParserreads theCOMMAND_WORDand identifies the input as aLinkrelated command and passes the input toLinkCommandParser. -
LinkCommandParserdetermines theaddaction required. It then proceeds to pass the relevant input toAddLinkCommandParser. -
AddLinkCommandParserchecks for the validity ofLINK_URLgiven by the user and creates the relevantLinkandAddLinkCommandobjects. -
AddLinkCommandcallsModel#getDisplayedModule()to find the required module. If it does not exist or is not currently tracked,AddLinkCommandthrows aCommandException. Otherwise, it then proceeds to callTrackedModule#hasLinkTitle(LINK_NAME)to check for an existingLinkobject with the sameLINK_NAME. -
If such a
Linkobject exists,AddLinkCommandaborts and throws aCommandException. Otherwise, the createdLinkwill be added to the specifiedTrackedModule. -
If the operation is successful, a
CommandResultwith the success message will be returned.
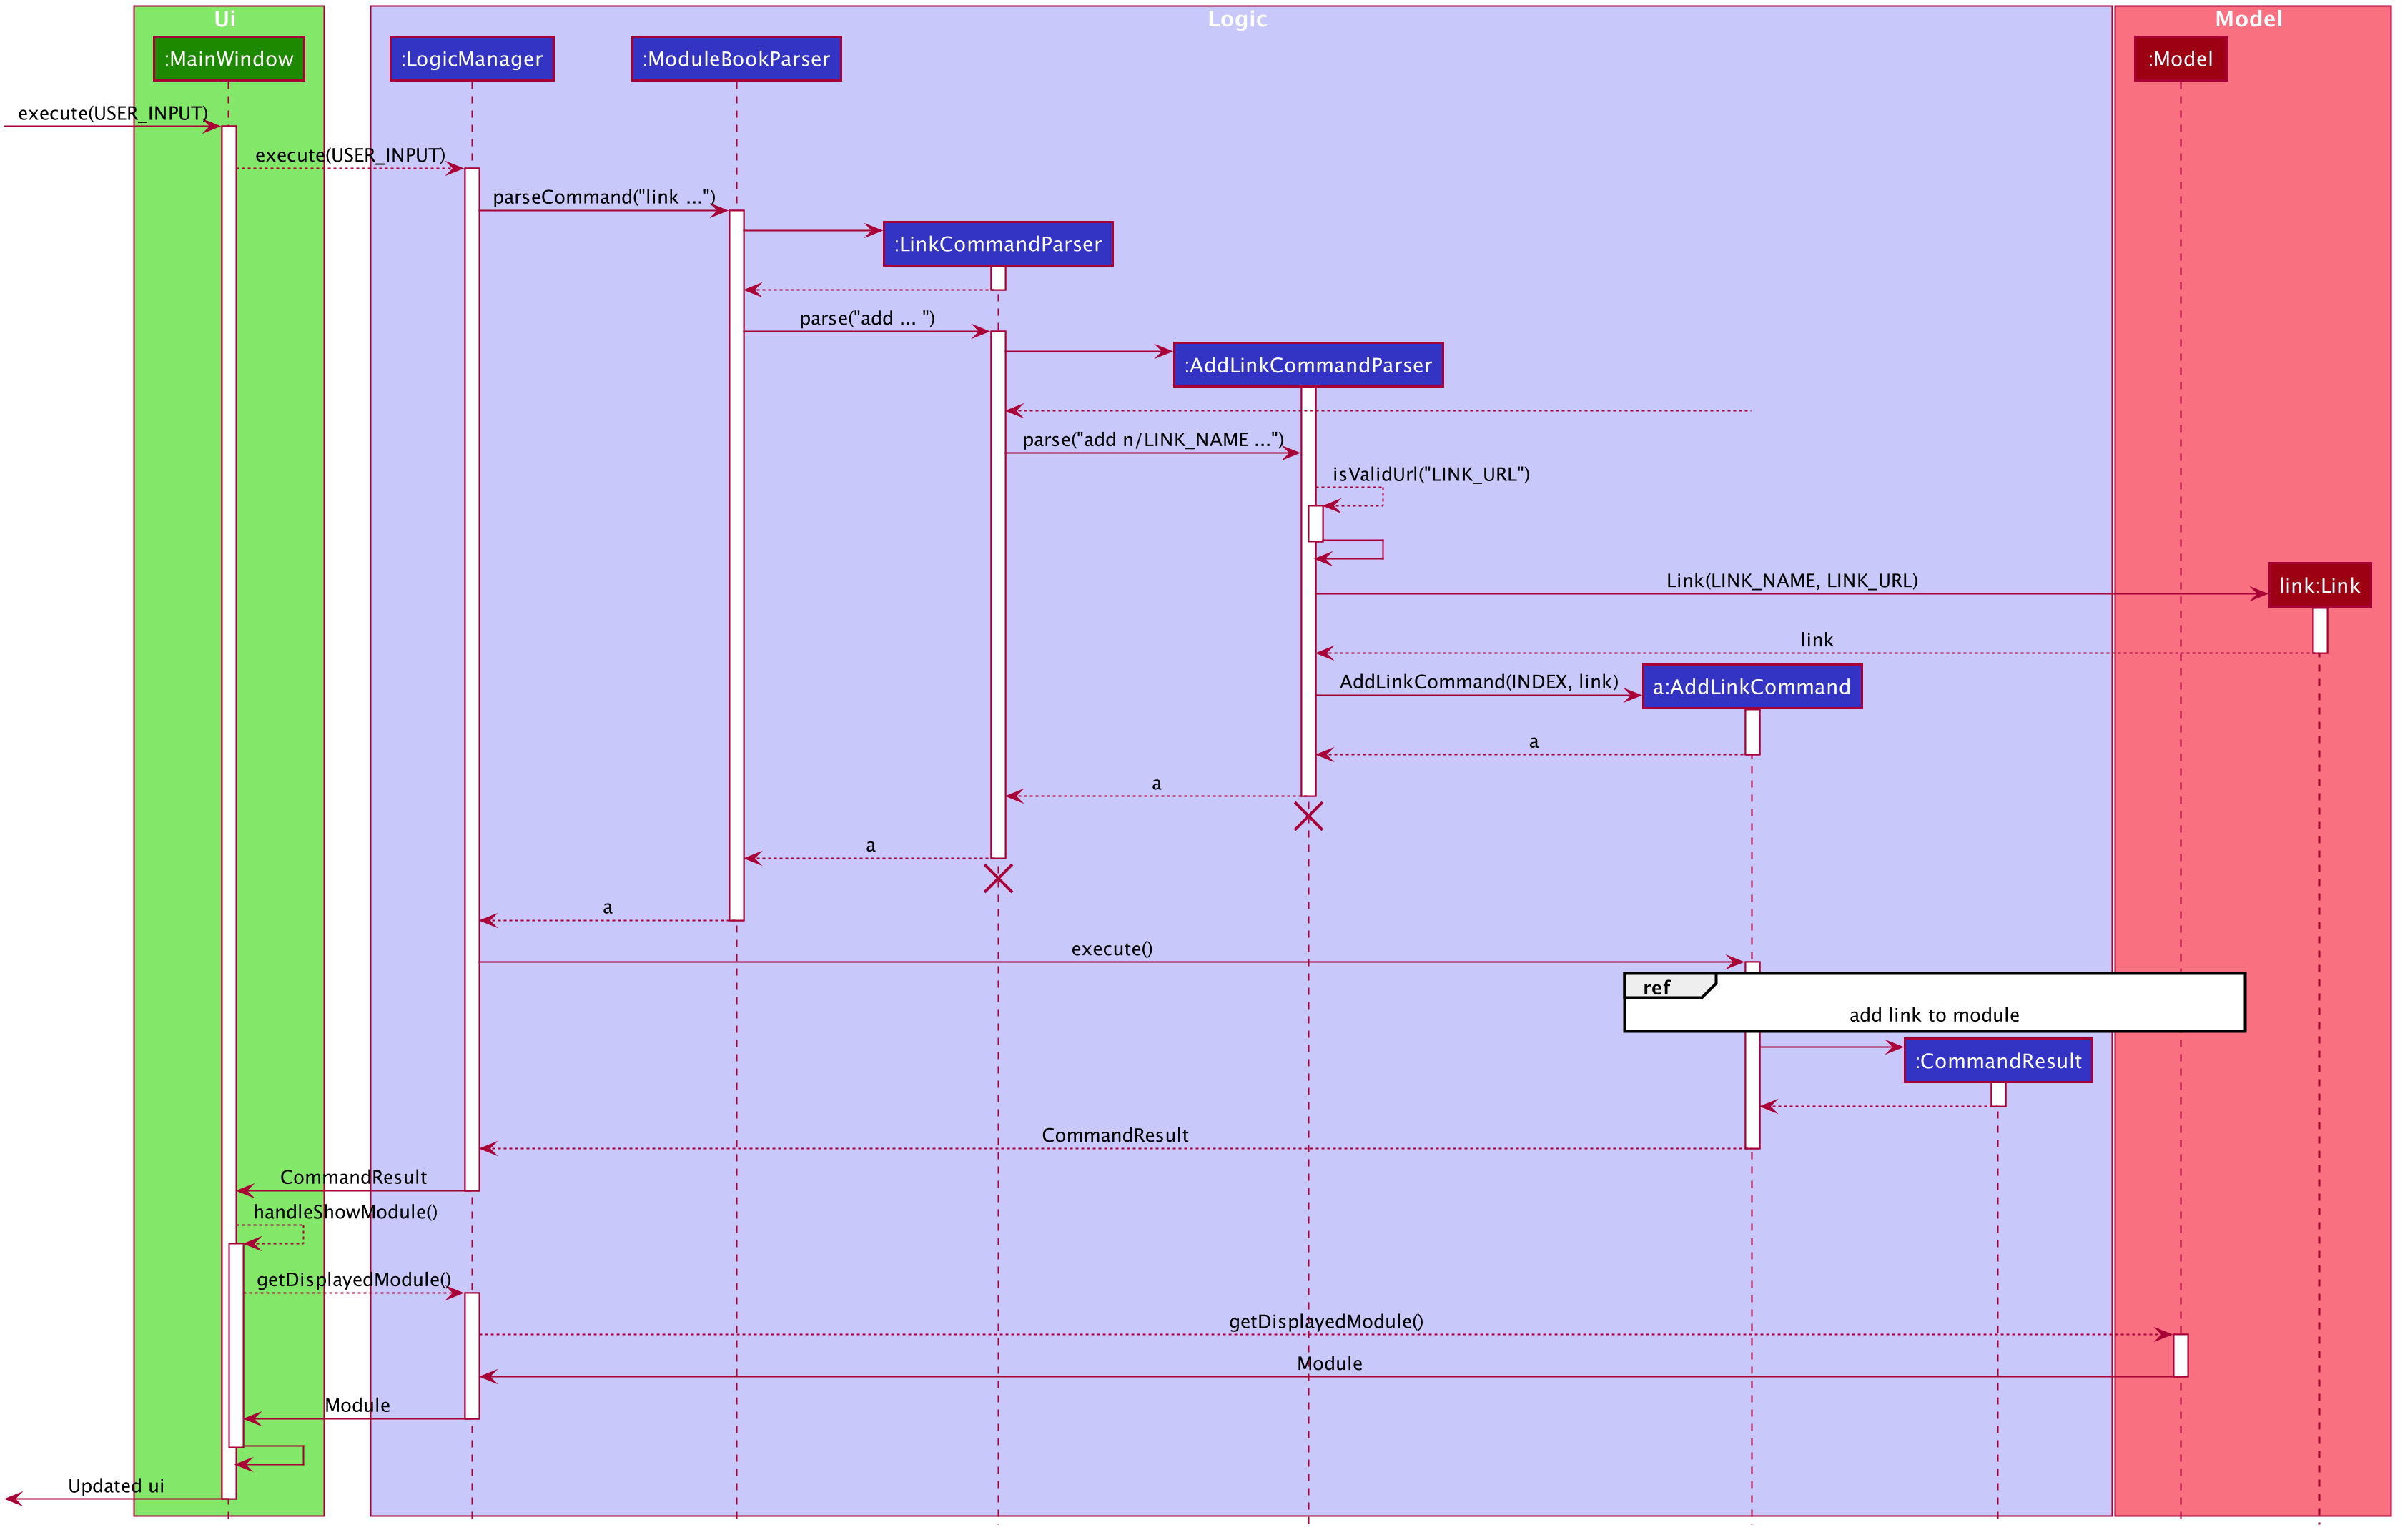
![][pdfwidth="50%"](images/AddLinkCommandSequenceDiagramExtension.png)
4.7.2. Design Considerations
Aspect: Data structure used for link management
-
Alternative 1: All
TrackedModulemaintain aArrayList<Link>. AddingLinkobjects will add to thisArrayList.-
Pros: Easy to implement and edit for beginner programmers.
-
Cons: Accessing and editing existing
Linkmight be less efficient. If number ofLinkobjects maintained increases,ArrayListmay not be optimal.
-
-
Alternative 2: Use
HashSet<Link>to maintainLinkin eachTrackedModule-
Pros: Reduces access time, since
Linkobjects can be obtained by givingLINK_TITLE, rather than searching the list linearly for a matching object. -
Cons: Difficult to add features. Future implmentations may add a
Priorityfeature toLinkobjects.HashSetdoes not support any form of sorting and thus may pose a problem.
-
-
Solution (current implementation): Adopt alternative 1. Since from a user standpoint, the number of links added to any module should not be too large to affect performance of application.
5. Documentation
Refer to the guide here.
6. Testing
Refer to the guide here.
7. Dev Ops
Refer to the guide here.
Appendix A: Product Scope
Target user profile:
-
is a student of National University of Singapore (NUS)
-
prefer desktop apps over web apps
-
can type fast
-
prefers typing over mouse input
-
is reasonably comfortable using CLI apps
Value proposition: manage modules faster and with less hassle than the traditional web apps deployed by the institution
Appendix B: User Stories
Priorities: High (must have) - * * *, Medium (nice to have) - * *, Low (unlikely to have) - *
| Priority | As a … | I want to … | So that I can… |
|---|---|---|---|
|
new user |
see usage instructions |
refer to instructions when I forget how to use the App |
|
user |
track a module I’m currently taking |
|
|
user |
untrack a module |
remove entries that I no longer need |
|
user |
find a module |
locate details of modules that NUS provides |
|
curious student |
view a module’s details |
check out if I want to take the module |
|
busy student |
add and manage deadlines |
keep track of my assignments and tasks |
|
organized student |
add and manage hyperlinks |
keep track of online resources and websites that the module uses |
|
student |
catalog past modules |
know what modules I have taken, and access the content if needed |
|
graduating student |
check what modules I need to complete |
|
|
computing student |
plan my focus area modules |
choose a specialization |
|
busy student |
prioritize certain modules (and their deadlines) |
manage my time better |
|
organized student |
add and manage files |
keep track of files related to a module |
|
organized student |
add notes to a module |
keep track of certain information about a module |
|
hardworking student |
access past exam papers |
download them without too much hassle |
|
organized student |
track my grades |
know roughly how well I’m doing in the module |
|
competitive student |
calculate my GPA |
|
|
new student |
schedule my modules |
plan how to approach my future focus areas |
|
student |
generate a sample module planner |
plan my modules |
Appendix C: Use Cases
(For all use cases below, the System is the ModuleBook and the Actor is the user, unless specified otherwise)
Use case: Find and Track a Module
MSS
-
User requests to find a module with incomplete keyword (e.g. 'CS2')
-
ModuleBook shows a list of modules matching the keyword (e.g. 'CS2030, CS2040, CS2100, CS2101, etc.')
-
User requests to track a module
-
ModuleBook tracks the module and displays to the user that the module is now tracked.
Use case ends.
Use case: Add a deadline for a tracked module
MSS
-
User requests to view the specific tracked module
-
ModuleBook displays the module details
-
User requests to add a deadline
-
ModuleBook adds the deadline
Use case ends.
Extensions
-
2a. The module is not currently tracked
-
2a1. User requests to track the module
-
2a2. The module is now tracked
Use case resumes at step 3
-
-
3a. ModuleBook requests for a description
-
3a1. User provides a description
-
3a2. ModuleBook requests for a datetime
-
3a3. User provides a datetime
Use case resumes at step 4.
-
{More to be added}
Appendix D: Non Functional Requirements
-
Should work on any mainstream OS as long as it has Java
11or above installed. -
A user with above average typing speed for regular English text (i.e. not code, not system admin commands) should be able to accomplish most of the tasks faster using commands than using the mouse.
-
Should be able to track and manage about 60 modules without unreasonable lag (as this is roughly more than the number of modules a typical student is expected to complete at NUS).
Appendix E: Glossary
E.1. Common Application terms
Home view - The state of the application that displays the home page in the main panel.
Module view - The state of the application that displays the specified module in the main panel.
E.2. Common Module terms
Archived - A module that the institution provides. Can be viewed and tracked. It is indicated by a gray vertical bar on the module list.
Tracked - A module that is tracked. References an archived module. Can be viewed and untracked. It is indicated by a green vertical bar on the module list.
Appendix F: Product Survey
LumiNUS
Pros:
-
Good deadline system
-
Working file management system
Cons:
-
A lot of GUI navigation involved
-
Cannot add user-generated deadlines
-
Cannot view past module details or content
NUSMods
Pros:
-
Easy to use and powerful module search feature
-
Modules come with schedules for tutorials, lectures, etc
Cons:
-
Not applicable for managing modules (such as deadlines, grades)
Appendix G: Instructions for Manual Testing
Given below are instructions to test the app manually.
| These instructions only provide a starting point for testers to work on; testers are expected to do more exploratory testing. |
G.1. Launch and Shutdown
-
Initial launch
-
Download the jar file and copy into an empty folder
-
Double-click the jar file
Expected: Shows the GUI with a set of sample contacts. The window size may not be optimum.
-
-
Saving window preferences
-
Resize the window to an optimum size. Move the window to a different location. Close the window.
-
Re-launch the app by double-clicking the jar file.
Expected: The most recent window size and location is retained.
-
G.2. Deleting a module
-
Deleting a module while all modules are listed
-
Prerequisites: List all modules using the
listcommand. Multiple modules in the list. -
Test case:
delete cs2103t
Expected: Module with module code cs2103t is deleted from the list. Details of the deleted contact shown in the status message. Timestamp in the status bar is updated. -
Test case:
delete INVALID_MODULE_CODE
Expected: No module is deleted. Error details shown in the status message. Status bar remains the same.
-